Tuesday, November 27, 2018
BASIL BECKY..... Gardening from the Heart: Why does my Christmas Cactus Bloom at Thanksgiving...
BASIL BECKY..... Gardening from the Heart: Why does my Christmas Cactus Bloom at Thanksgiving...: WELL...it is because it is a Thanksgiving Cactus (Schlumbergera truncata) versus a Christmas Cactus.( Schlumbergera bridgesii ...
Why does my Christmas Cactus Bloom at Thanksgiving?

It is such an easy plant to take care of and gives me so much joy knowing that my mom loved it.
Look at the leaves....

This is the secret. The Thanksgiving Cactus leaves "phylloclades" are serrated or toothed. The Christmas Cactus is more rounded.
Here are some tips for care of this precious plant:
#1 Allow the soil to dry out during resting periods or when it is not producing bloom
#2 Water only when the soil is dry to touch. Overwatering can kill the plant. Provide plenty of light and room temps of 60 to 65 degrees.
#3 There are all kinds of ways to promote more blooms etc but I just let it be..in the same space. Maybe because I am a Beatles fan. But my Thanksgiving Cactus that was given to me by my mom I just "Let it Be"

Tuesday, November 13, 2018
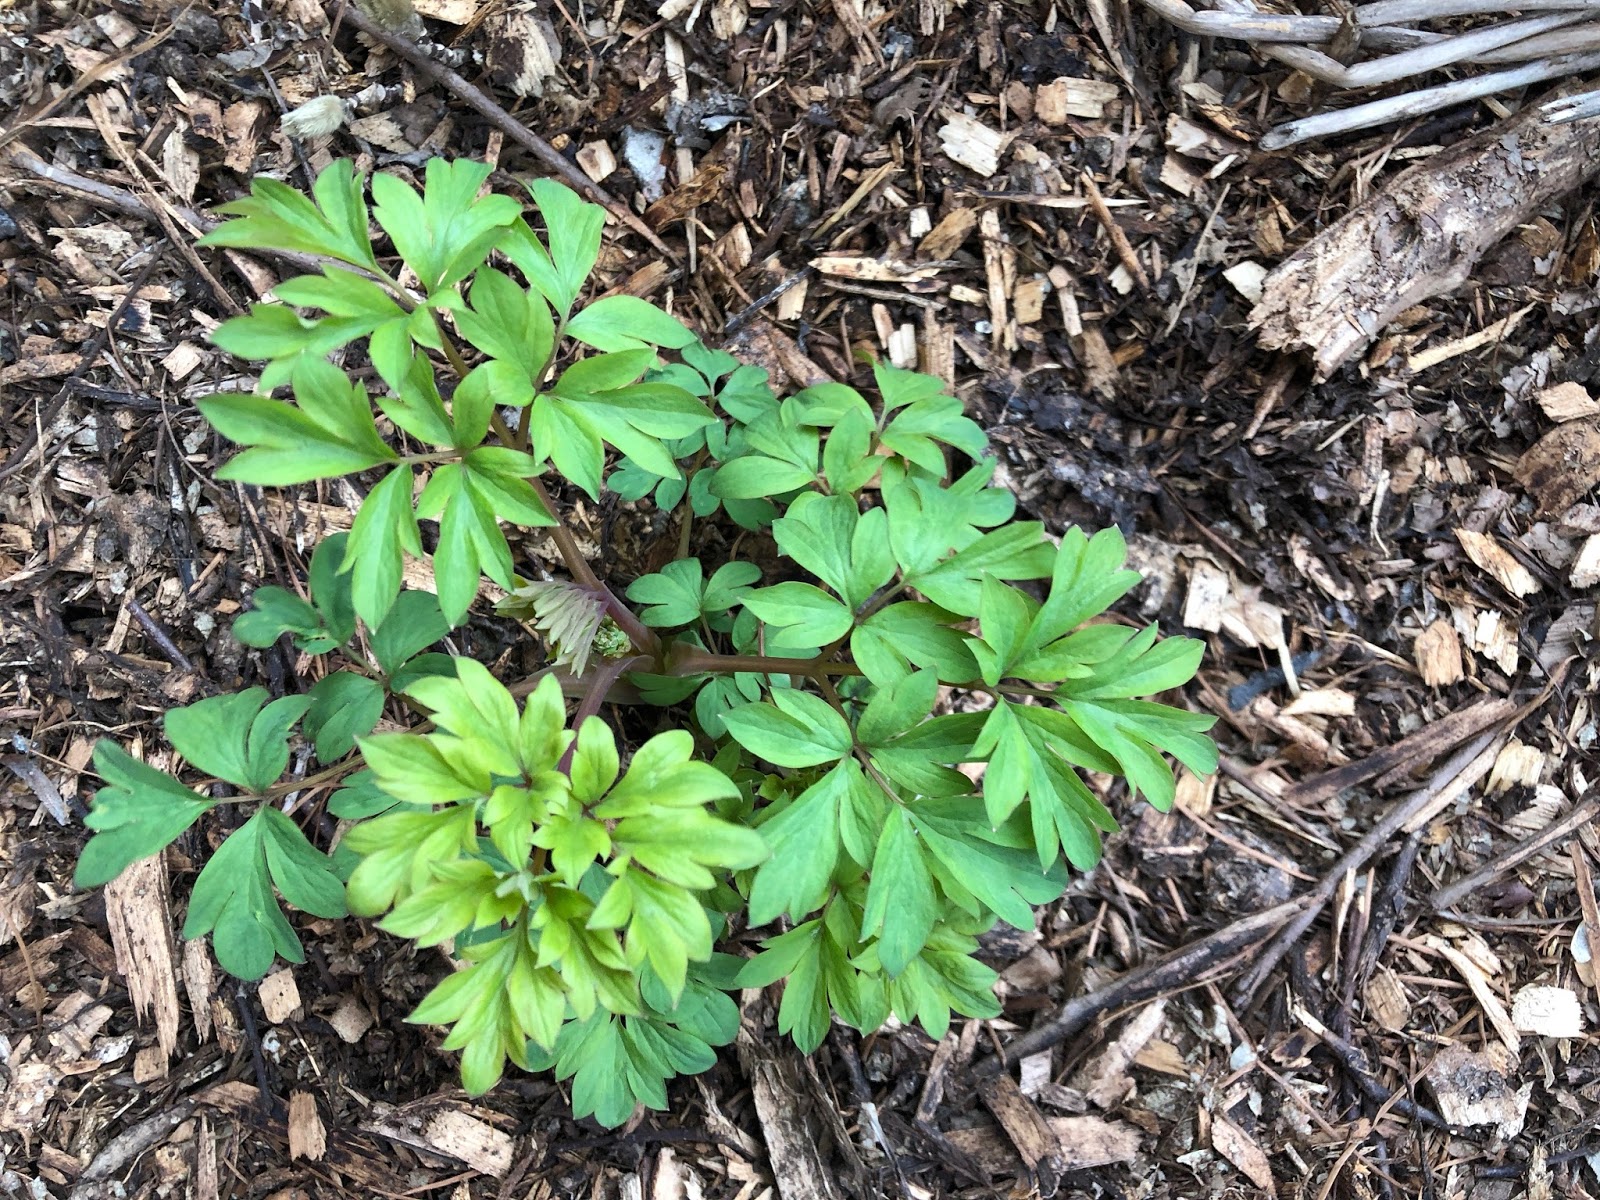
My Favorite Fall Flower
I moved into my house some 32 years ago in late spring. That year was a year of plant discoveries. Early in the growing season, I began to see paddle-shaped leaves some getting about 24 inches long and 6 inches wide. They are a very attractive olive green.
I was just way too overwhelmed by the potential and all the plants emerging on my 7 amazing acres of land to focus on these particular plants growing and growing.
However much to my surprise around September, these plants presented me with a gift, a gift that has continued to be my favorite fall flower for the 30 years I have lived at my Kentucky Homestead.
"Aster tataricus" is the most amazing pollinator loving flower. How do I love it let me count the ways?
#1. It stands straight up and does not fall over or flop like other Asters until the very end of the season.
#2. It is a low grower and does not really start shooting up in the garden until the perennials around it are ready to retire for the season.
#3. The pink to purplish flowers are loved way into the late fall season. In fact, one time I was so focused on taking a photo of a monarch feasting on the blooms that I did not even notice a hummingbird enjoying the blooms one bloom away.
#4. It is such an easy reliable old faithful. I have even seen praying mantis, native bees, wasps and so much more.
#5. Native, perfect for naturalizing. I love to share and it has been so popular at our Master Gardeners plant sale.
So this one wins.....if you can't find it, email me and I will send you one!


Monday, September 17, 2018
So Where has Basil Becky Been?
This has been a very different 6 months for me. So many life changing events have happened.. My gardens are my soul and to have let them go this season has been hard, But I will tell you so much good has come out of the last 6 months. The gardens have flourished, I was blessed with the opportunity to spend so much time with my daughter before she moved to India and all is ok.
This is the article that was published in the September Kentucky Gardener 2018. I finally put Kalee, Tallulah, and Huck( 8 weeks old) on a plane to India the end of August...a month after we thought. But they are happy and together, Lulah said it best when they were eating one of their first meals to together in India and Lulah took their hands and said: "it is so nice to be home". I think to a 3-year-old home where the heart is...where the family is together. Oh, the wisdom we can reap from the mouths of babes.....

Article Published in the Kentucky Gardener September 2018
Rebecca Stoner Kirts
“Let it Go”
Only in Kentucky
September 2018
There are sometimes in one's life that you just have to let things go. Very few of life’s happenings slow me down in the garden. But this year has been different as a combination of events put limitations on my usual obsessive compulsion to play in my dirt.
It all started in March with the arrival in Kentucky of Tallulah, my 2-year-old grandbaby, and my daughter. Kentucky was a waypoint in their move to India where my son-in-law had accepted a job and was already working there. Tallulah's adventure had become more joyfully compounded by the upcoming birth of a new baby brother in June. It was an exhilarating time for sure.
So the brakes were put on planned garden tours, talks, and other Basil Becky outings. But somehow during this very unusual spring, a new appreciation for my garden emerged.
I began to look at my outdoor spaces through the eyes of a toddler. My soft garden soil became her digging areas, where she could aerate the earth with her tiny shovels and trucks.
My weeds became gems to pick and make fabulous dandelion necklaces. Too many violets? No worries they made great floating beauties in pails of waters. Scattering seeds was a joyful chore to her which soon resulted in a significant culinary adventure of tasting all of the emerging bits of lettuce. Of course, this pushed me to research which of my many plants are edible. Some fun lessons were learned.
Who knew her young palette would enjoy fresh asparagus plucked straight from the bed as it poked its stalk up from the ground, or that she would take such pleasure in eating the rhubarb straight up just as I remembered my father doing many years ago.
I now realize I did not miss much by not planting my usual spring veggies; it was a cold, snowy time anyway. There was plenty of opportunities after Lulah left to pursue a prolific vegetable garden.
Because I did not have the time to mess with existing beds, it allowed many of my plants to reseed and spread naturally. The Cottage Garden greatly benefited from the neglect.
Now with a trip to India, planned for late fall, I am taking this approach one step further. "Letting it Go" will be applied to the fall garden clean up as well.
This fits nicely with what I have been reading about how important it is to not pristinely clean the garden in fall. In other words, leaving vegetation is very beneficial to insects, bees, bugs, and butterflies by providing them with homes and food for the winter. Tallulah loved to chase the butterflies, search for little bugs and watch the robins pecking at the ground to find food for their newly hatched baby birds. How sad for all of us if she returns next spring to a garden void of her favorite things just so my gardens look tidy.
There are other reasons for adopting this 'Let It Go' philosophy with regard to fall garden chores. I agree with a quote from a blog I recently read " It is time we make the environment more important than looks. It is time that we do things which are best for the other life forms around us" (Robert Palvis; Garden Fundamentals.)
I also have been profoundly influenced by the writings and lectures of Doug Tallamy. In his two Books "Bringing Nature Home" and the "Living Landscape." He makes so many positive arguments for us as home gardeners to put our weedwackers and pruners down for the fall and let our gardens be.
My beloved Firefly population is in decline, and they need leaf litter to spend their entire larval life safe and sound, according to Dr. Tallamy. Who among us has not set out on their porch swing and watched as a young person witnesses the miracle of the twinkling fireflies coming up out of the ground?
Leaving flower seeds heads on my many coneflowers and black-eyed Susans allows me to watch as the finches, and other birds feast all winter long.
According to Dr. Tallamy, "Much of the insect community is spending winter, in the debris, we get rid of" such as our Native Bees. Our butterflies, other than Monarchs, that hang in our garden for the winter also need a safe home for their cocoons. Stems cut down stuffed into black plastic bags or into piles that could be flattened by snows etc. are not conducive for survival.
We also need to be mindful that toads, frogs, salamanders, lizards all need safe havens in which to hibernate as well.
Since I have honey bees, I am always looking for natural ways to control the pest in my gardens. By providing resting places for the beneficial bugs, like ladybugs and praying mantis's perhaps these beneficial insects will return the favor and hang around all next summer and eat up some pesty whiteflies.
So my plan is set. I will get rid of any diseased leaves, clean up the vegetable garden a bit but very minimally when compared to my previous efforts. I will be very careful to not disturb or disrupt my other gardening spaces. In addition, I will shred my tons of leaves from all my trees and spread them around the gardens (Free mulch)
As an added benefit, with the time I have freed up, I can tackle some of the chores that I sometimes do not seem to get completed; such as giving my tools a much-needed cleaning. Here is another bonus, I will not feel stressed taking some time to fly to India and visit my grandbabies!! But by far the biggest benefit will be when I walk through my messy winter gardens and smile while dreaming about showing Lulah the fireflies next year...
So my plan is to start blogging more and please check out my Instagram and Facebook page. Instagram Basilbecky and facebook rebeccakirts and my articles and photos in Kentucky Gardener Magazine.
I hope to give you great info on gardening ..plus some humor and love of my passions..nature, garden, travel, and family ...The best is yet to come...
I hope to give you great info on gardening ..plus some humor and love of my passions..nature, garden, travel, and family ...The best is yet to come...
Friday, May 18, 2018
Peonies are my number #1 ..... and other fun project
This weekend number one on my agenda is to ID and count my hundreds of Peonies... They are all older varieties and were here when we purchased the house some 23 years ago. In fact, they had me at Hello!


 Houses must go up. We all need a home! Then I need to check out my Bees....


#2 I must plant all the many seeds packets I have accumulated over the last couple months. Plus all the seeds that are now baby plants from my Winter Sowing Project... Stay tuned for the results.. I am very excited.

Then I must plant the herbs from my talk in the Herb Garden at the Park and finish up my herbs as well.

Also Native Bee Houses and Pollinator


The list is endless but all good fun... But wait they are calling for rain!
Stay tuned for an update on what I really do accomplish.
Wednesday, March 28, 2018
Sprouting Tasty Treats
One of my favorite blogs to follow is Garden Therapy. It is a great resource for wonderful DIY garden projects. My interest was peaked when I read a posting about "Mason Jar Sprouts".
 There were three different combinations of seed mix. The Sweet Mix which includes Alfalfa, Broccoli, and Clover Alfalfa. The Crispy Mix, which includes Green Peas, Green Lentils and Red Lentils and the last one was The Spicy Mix, consisting of Clover and Radish Clover. We started with The Crispy Mix and it was delicious!! We have now moved on to The Spicy Mix. There are enough seeds in each packet to do multiple sprouting sessions.

The directions were so easy to follow. But first we, of course, made sure all the components were totally sanitized. We then filled the jar with 2TBLS of seeds. Added enough water to cover them and then replaced the sprouting lid. This is the part that my grandbaby enjoyed...we swirled the seeds around inside to rinse them and then drained the water out through the lid. The first night we then covered them with 2 to 3 inches of warm water and let it soak overnight on the countertop.
 The next morning we drained the seeds and rinsed them again and drained the jar. I did this another time later in the day. The directions said to follow this procedure for 3 to 7 days. By the end of the 3rd day, we could see the seeds starting to sprout.
 It was so fun and great for Lulah who is 2 1/2 to see the results so quickly, but equally as wonderful for us to have this nutritional treat for topping on salads.
 The jar filled up quickly for the next couple days and soon we were tossing yummy nutritional bits of goodness into salads, sandwiches, stir-fries, on veggies, or in soup.
 They recommend when the jar is full to slow down the growth by moving them to a salad spinner and storing in the fridge. They recommend using the sprouts within 5 to 7 days. I kept stirring them to keep them from clumping together. We did not have to worry about them going bad, they were happily consumed way before they expired.

She was offering a Kit that included everything you would need to grow tasty sprouts right on the countertop. Since my Vegetarian daughter and grandbaby were here for an extended stay, I decided this would be a fun and timely project for us to do together.
The kit came complete with a ball, jar a sprinkle lid, seed packets and great directions that made Sprout Growing fun and worry-free. Plus a cute chalkboard label and pen to mark each new batch.


The directions were so easy to follow. But first we, of course, made sure all the components were totally sanitized. We then filled the jar with 2TBLS of seeds. Added enough water to cover them and then replaced the sprouting lid. This is the part that my grandbaby enjoyed...we swirled the seeds around inside to rinse them and then drained the water out through the lid. The first night we then covered them with 2 to 3 inches of warm water and let it soak overnight on the countertop.


If anyone has purchased the small containers of sprouts from, in my case, Kroger for almost $4.00 you know how quickly they turn rancid. Not the case with the homegrown sprouts.
Thanks so much to Garden Therapy and the site www.Garden Trends.com Please check this out Seed Collection, plus the other offerings. This was such a tasty and fun project. %100 Satisfaction and I will definitely be ordering again.
Tuesday, March 13, 2018
Hints of Spring?? Maybe??
So I thought I would tease you with some of my first glimpses of spring. I have had my amazing garden helper mulching. I hope it is not too early, but I have tons of great mulch and he is leaving and going home in two weeks.
So here are my early Spring Delights. Enjoy

The Saucer Magnolias are just so excited to pop open and fragrant the air.


Wednesday, February 7, 2018
My Winter Sowing Project
Winter Sowing
I first heard about his technique for starting seeds on a podcast. The couple giving the talk were homesteaders in Texas. They had extensive gardens and also sold plants. They propagated most of their seedlings using this method.
Listening to there podcast set off a light bulb in my head. It started the wheels in motion, so I committed to trying Winter Sowing. The commitment occurred last summer, and now it is the end of January. Yeah, I have followed through on my decision and am very anxious to see the results in a month or so. I am going to just lay out an abbreviated outline of where I am at now, as I am writing an article on the subject for The Kentucky Gardener. (That was another reason I felt I had to accomplish this goal)
#1 I began to recycle an unusual assortment of potential containers. Milk Jugs, Vinegar Jugs (of which I had many from my Herb Vinegar project), fresh greens containers, large fruit plastic containers, and liter beverage bottles all went in the pile.
#2 I decided to start with perennials since I have no greenhouse and have not had great luck with these from seed elsewhere. I do pretty good direct sowing annuals in the garden, but end up spending a fortune on purchasing new perennials.
#3 All summer I collected speed packets, buying some when they all seem to go on sale after the planning season rush. I will be more selective for the next Winter Sowing season. I have already started making a list.
#4 Here are some I am trying this season:
One can never have enough Parsley both the curly and the flat leaf( I need an abundance of these for my Spicebush Swallowtails to munch on).
Hollyhocks (I have not yet conquered this beauty, it always dies in my garden, but I am determined).
Butterfly Weed, (to add to my butterfly garden), plus some coneflowers and various other perennials.
#5 Early in January, I enlisted the help of my husband to cut the bottles for me. I have a lousy track record with knives, so I thought this the best approach.
#6 The milk and vinegar jugs, We cut open about 1/3 of the way down and just 3/4 of the way around. So it was like a lid that opened but was still attached. By doing this, allowed us to plant the seeds quickly. And when they are ready to venture into the real world, we will be able to transplant them into the garden swiftly. Randy also provided drainage holes on the bottom using both a carbon knife to make slits and some he used a drill.
#7 The greens containers already had hinge type lid and just needed some drainage holes. I am eager to see if there is a difference in the vessels used as far as seed germination. I did divide the seed packets between both styles of containers so I could make a side by side comparison.
#8 I purchased a good seed starter mix and filled each container with at least about 4 cups of the mix. Next, I made sure the soil was wet.
#9 Following the directions for seed planting depth, I sowed each container. I was also cautious about the amount of cover soil placed over them. Then I water them into their winter home.
#10 A word of caution, label each container. Anyone who has started seeds and skipped this step realizes, seedlings tend to all look very similar. I marked each filled container in two places. First I used a water soluble pen and wrote on a plastic knife, which used the duct tape closing up the jug. (See next step)
#11 At the point I wished them all a good growing season and buttoned down the hatches. I used duck tape I had around the house to seal the cuts, made sure the caps were off the jugs and took them outside to my patio table. Since I had a somewhat eclectic array of duck tape, including Mickey Mouse, from a project with my grandbabies, my Winter Sowing project table is very colorful.
#So then off to the patio table to incubate. They will all sit there through sleet and snow, freeze and thaw, rain and sun, hopefully, to germinate into lots of new plants to grace my gardens.
Stay tuned.... I will keep you updated.
 |
| Here is my collection of seeds |
 |
| This is the potting medium I used |
 |
| Jugs were cleaned and prepared |
 |
| I filled the varied containers with soil |
 |
| I used platstic silverware to ID each container's contents |
 |
| All watered in ready to go to the porch |
 |
| My Kentucky Greenhouse! |

Monday, January 8, 2018
A few more Holiday Hits.... Rum Raisin Bread Pudding
This panettone was my inspiration for this dessert. I found it at Sam's Club. It was a great hit. Easy and loved by all, I was hoping I would have leftovers for the many gatherings scheduled, but no go. It was gobbled up....
 Nothing is better than a bread pudding. Especially a spiked bread pudding. This dessert was a great hit, mainly since I served it with homemade whipped cream with a hint of cinnamon. I took a recipe from Food Network courtesy of The Neeleys and changed it up, for my personal touch.

My Ingredients:
3 cups half and half
3 Tablespoons butter
1 Teaspoon ground cinnamon
3/4 cup cane sugar
3 Tablespoons rum
1/2 cup raisins
One loaf of panettone/with chocolate chips, torn into chunks.
4 eggs beaten
Preheat the oven to 350 degrees. In a saucepan, add cream, milk, butter, vanilla extract, cinnamon, cane sugar, rum and raisins and heat until sugar dissolves.
Take a large bowl add the cubed bread and pour the hot mixture into a bowl. Let it sit for 30 minutes or so until the bread absorbs the liquid.
Add the beaten eggs to the bread mixture and stir. Pour this into a large buttered cast iron skillet and bake for 50 minutes.
Not only will your house smell heavenly, but you will also have delighted guests. And don't forget the whipped cream.
Enjoy...
Subscribe to:
Posts (Atom)

LinkWithin
